Shirshasana or Head stand pose | Steps and Benefits

Shirshasana or Head Stand Pose or Inverted asana is balancing whole body on your head with the help of your hands or forearms, taking your legs in the upward direction. It is exactly opposite to standing on to the feet. This is also called as Yoga Position on Head and Hands.

The exact position of this asana looks like below image. It is one of the important asana which should be done daily. It has many benefits that every person needs in today’s unhealthy life style. 

Shirshasana
Shirshasana or Head stand pose

It looks little difficult to do initially but if you practice it daily with proper steps you will be able to master it soon. But don’t make any hurry to achieve it. It is called Yoga Position on Head and Hands because in this position one needs to balance whole body only on Head and both the Hands.

If you are doing it for first time, you should follow Shirshasana procedure provided below (1, 2 and 3) and should go in same sequence step by step to achieve the final pose. Please don’t try to do the final step directly else it might harm you.

Shirshasana for beginner

When you do it for first time or doing it after long time, you should follow below steps to achieve the final pose. We have provided the images of different Shirshasana steps to make it easier to start. Always lay a soft cloth or a mat on ground and practice yoga on it.

  1. Sit on the knees and interlock the fingers of both the hands. Keep interlocked fingers on the floor and keep crown of the head on it (palm of hands). See Fig. below
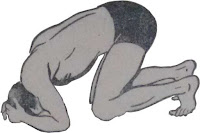
    Shirshasana Step 1
    Shirshasana Step 1

  2. Lift your buttock slowly and transfer your body weight on head. Once you are comfortable with this go for next step. See Fig. 2
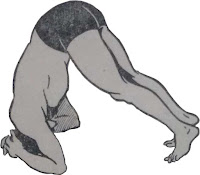
    Shirshasana Step 2
    Shirshasana Step 2

  3. Slowly lift your legs in upward direction. Don’t keep legs straight until you can balance them properly in the air.  See Fig. 3
    Shirshasana Step 3
    Shirshasana Step 3

  4. Once you will get a fine balance of the legs, try to make your legs straight slowly. This is a final step.

Once you master the technique of keeping the legs straight, it will be a complete Shirshasana (head stand pose). 

If you are beginner and just have started yoga, then you can take a support of other person or can take a support of wall as well. Once you are fine with the balancing of legs in the air, then try it without support. Please don’t do it forcefully or leave the position if you are losing a balance.

Shirshasana time

In the initial stages, this asana can be started from 5 – 10 seconds. You can increase by 3-5 seconds every 7-15 days and can slowly increase it up to 1 minute.
When you master the procedure and can keep yourself in his position for some more time, you can try to be in this position from 1 minutes to 10 minutes. 

Shirshasana precautions

  1. Keep breathing normal. If you feel any problem in breathing while being in this pose, please stop it immediately.
  2. If you feel anything like dizziness, headache immediately stop it. 
  3. When you have headache, toothache, pains or itching in eyes, please don’t do this asana.
  4. If you have any type of blood pressure don’t do it because in Shirshasana, all blood flow goes toward your head which may cause serious problem to the BP patients.
  5. Don’t do it when you have fever or weakness etc.
  6. Person with any injury should always avoid it as this pose needs real strength to lift your body and keep it on head with the help of arms for some time.

Shirshasana Benefits

  1. Yoga poses are designed in such a way that it makes tremendous effect on all the glands in the human body. To stimulate these glands and for their good functioning, all they need is a sufficient blood flow, which is controlled by brain. In this pose, the brain gets a good amount of blood flow to blood vessels. 
  2. Humans always stand on their feet, due to which brain gets less blood flow which ultimately causes to headache, dizziness etc. it gives good amount of blood flow to the brain which removes the root cause of headache, dizziness etc. or reduces the chances of headache, dizziness etc.
  3. Regular practice of the it gets a natural enthusiasm which keep person fresh and active whole day.
  4. It also reduces the constipation. Due to inverted position, it decreases the stress on digestive system which ultimately causes in reducing constipation.
  5. It increases the power of spinal cord, arms, legs as full body weight goes on these three organs. 
  6. Brain is controller of blood supply to whole body and as the brain becomes more active due to good blood supply It also improves the blood circulation in whole body.
  7. Beneficial in relieving stress and stimulates brain cells due to proper blood circulation.
  8. It improves functioning of abdomen.
  9. It stimulates the pituitary and pineal glands. 
  10. It strengthens the lungs.

Shirshasana is one the best asana which is beneficial to almost whole body. If you compare it with other types of exercises, there no provision made specially for brain stimulation. Other exercises focus on upper and lower body but in this position, we get good effect on brain and it’s functioning. This is a gift of ancient Hindu culture to the world YOGA which is beneficial in every situation to build yourself physically and mentally. 

If you like this article, please like and share it. Let the world know about this magical asana Shirshasana, Head Stand Pose.

Popular posts from this blog

सिद्धासन माहिती आणि फायदे मराठी मध्ये 

मनाची एकाग्रता ही बुद्धीचं काम करणाऱ्या लोकांसाठी अतिशय महत्वाची असते. विद्यार्थ्यांसाठी, खेळाडूंसाठी किंवा असं कुठलाही काम ज्यात अतिशय एकाग्र होण्याची गरज लागते अशा सर्व लोकांसाठी सिद्धासन हे अतिशय उपयुक्त आणि सोपं आसन आहे. योगाभ्यास करण्यासाठी सुद्धा मनाची एकाग्रता लागते म्हणूनच इतर सर्व आसनांच्या आधी हे आसन केलं जातं ज्यामुळे पुढील आसनांचा अभ्यास एकाग्रतेने होऊ शकेल. सिद्धासन म्हणजे काय? सिद्धासन म्हणजे सिद्ध लोकांचे आसन किंवा आसनांचा अभ्यास करायला सिद्ध करणारे आसन. या आसनाचा नियमित अभ्यास करणाऱ्यां लोकांमध्ये आपल्या मनावर खूप चांगल्या प्रकारे ताबा ठेवण्याची क्षमता असते. ज्यांना एखादी सिद्धी मिळवायची आहे म्हणजे एखादं ध्येय गाठायचं आहे अशा लोकांसाठी सिद्धासन हे अतिशय उपयोगी आहे. सिद्धासन हे मुख्यत्वे मानसिक एकाग्रतेसाठी उपयोगी पडते. तसेच कुठल्याही प्रकारचे श्वसनाचे व्यायाम अथवा ध्यान करताना सर्वात सहज अणि सोपे आसन म्हणून याचा निश्चित उपयोग होतो. माणसाच्या मनाचे शत्रु समजले जातात ते षडरिपु म्हणजे ...

Pranasana - Steps and Benefits

You might like our post How to do Shalabhasan or Grasshopper pose Pranasana Steps - Sit upright on the ground and relax yourself. Now, keep your legs straight in front of you. Bend the left knee and keep the left foot on the right thigh. Bend the right knee bringing the sole of the right foot to the ground in line with the left knee. Now, try to keep right arm on some distance (as much as possible) from the body but that arm should be below the right knee. Keep left arm near the body for support. This is Pranasana. This should be done from other side also to keep the balance of the exercise. Precautions to take before doing Pranasana - Do this asana with an empty stomach. Don’t eat anything 3-4 hours before doing this asana. Don’t do it forcefully. Do it, till you fill comfortable otherwise it will harm you. Take doctors advice before starting to do this asana. Weak people should do it very carefully. Do this pose in the morning. Beginner – Do it for 5-6 seconds ...

Gomukhasana or Cow Face Pose - Steps and Benefits

Indian Yoga has many asanas/poses which gives really unpredictable but positive results. This is another next level of asana or a position. When we complete the position of Gomukhasana, it looks like a Cow Face, so that it is called Gomukhasana or Cow Face Pose. You might like our post How to do Ardha Matsyendrasan or Half Spinal Twist Pose Steps of Gomukhasana or Cow Face Pose - Sit on the ground with stretched legs in front of you. Keep your back strait and erect. Now slowly bend your left leg, and place it under your right buttock. Then bend your right leg and place it over your left thigh. Keep your both knees close together as they are stacked one on top of the other. Now, slowly fold your left arm and place it behind your back. Take your right arm over your right shoulder, and stretch it as much as you can until it holds your left hand. Initially, it will be little difficult to do this. But after some days of practise, you will be able to do it. Keep the trunk...